Welcome
This is Digital Clarity Group's Partner Finder marketplace. The purpose of this site is to help enterprise buyers develop an understanding of the digital partners they could engage for a current or upcoming marketing technology initiative.
Getting Started
If you're interested in listing your organization on Partner Finder, just follow the steps on our Enroll Your Firm page.
General Recommendations
The purpose of Partner Finder is to help enterprise buyers find and connect with digital partners. This is accomplished by providing complete and accurate profiles that make them easy to find. Please consider the following, high-level tips and recommendations for getting the most out of your Partner Finder profile.
- Complete your profile to the very best of your ability and follow all guidelines carefully. Increasing the quality of your profile will improve the chances that prospective clients will find it as intended.
- Many fields provide a help text field to provide useful information while completing the listing process. Please follow these recommendations carefully and let us know if you have questions or suggestions.
- Please keep in mind that this is version 1.0. We would love your input if think we are missing information that would be helpful, or if you don't see a competency or product in the lists -- we'd be happy to add them. Also, if the directions are confusing, feel free to let us know how we can help to improve them.
Locations
Using the directory search, sort, and filter system, users have the ability to discover Digital Partners by the location of their offices in a variety of different ways. These include:
- Basic search on any term, such as the name of a city, state, or country
- Distance from the office, by placing a pin on the map and setting a desired distance
- Filtering on either headquarters or all offices (HQ is the default filter so that each partner is listed once. If the filter is changed to show all offices, every office for each partner is listed)
- Sorting on office location
In order for all this user functionality to work there are a handful of guidelines and requirements to improve the quality of your directory record. Our goal is for potential prospects to find your record as accurately and easily as possible.
Required Fields
There are only three required fields for each location.
- Location Name
- Latitude
- Longitude
Filling in the rest of the location fields will provide more ways for end-users to find your record when searching for locations using keywords or phrases. We also may have features on the roadmap which will better leverage location data so be as comprehensive as you possibly can.
Latitude and Longitude
In order to streamline the process of entering coordinates, we've added a Google Maps plugin allowing you to simply drop a pin on a map. The system will then automatically populate the latitude and longitude fields. This data is leveraged when end-users filter their list with the 'Distance From' widget, thus it is not necessary for it to be perfect to your address. Just place the pin as close as you can to the actual location.
Headquarters
In order to ensure your Digital Partner record is properly displayed, it is necessary to add at least one location which has the Location Name field set to 'Headquarters'. To make this easier, the first location name is set to Headquarters by default, so you should not change this value.
Other Offices
You can set the Location Name of other offices to anything you like, though we recommend using a simple, easy to understand convention such as 'City Name Office' or 'State Name Office' to improve search results. Examples include:
- Boston Office
- California Office
As of v1.0 the Directory does not have fuzzy search so it's important to ensure your Location Names are spelled properly.
Adding Additional Locations
As of v1.0 of the Directory it is necessary to save and re-edit your record to add additional locations one at a time.
Adding Images and Files
Some fields, like the Partner Overview, allow the addition of images (and files) as part of the content. If you'd like to take advantage of this feature, here are the steps.
Step 1: Click the little image icon in the tool bar of the text editor.
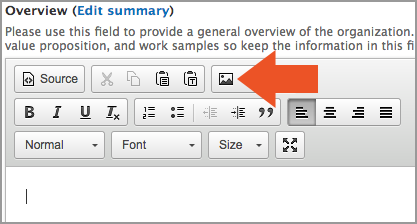
Note: If there is no tool bar on the field you are editing, it means that field does not support images (or any HTML).
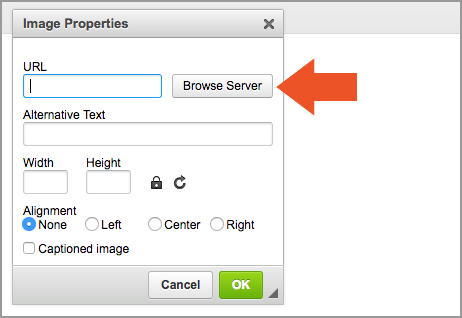
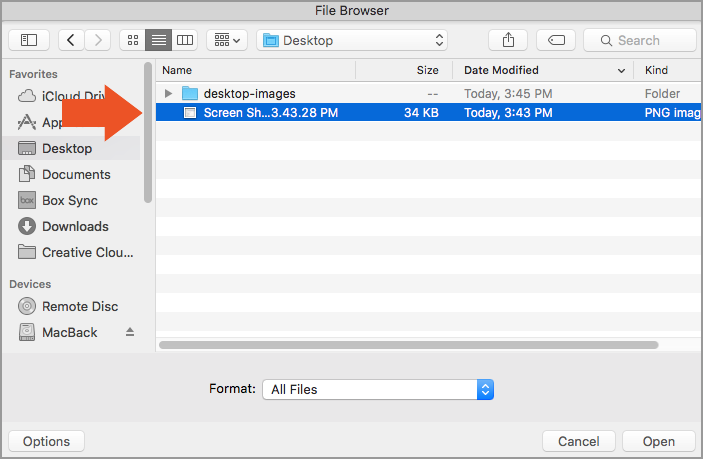
Step 2: Click the browse server button to browse your hard drive for images
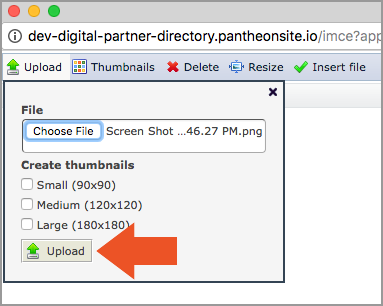
Step 3: Click Upload
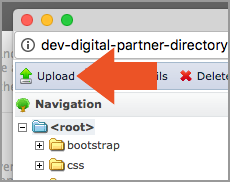
Note: The Upload button is hidden in the top left corner of this dialog window.
Step 4: Click Choose File
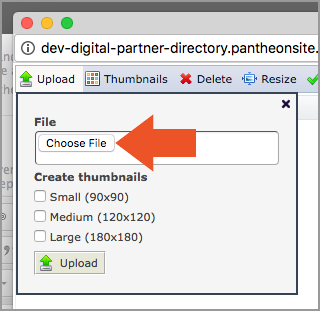
Step 5: Browse to and select the desired image on your computer
Step 6: Click Upload. At this point the image will be dropped onto your page.
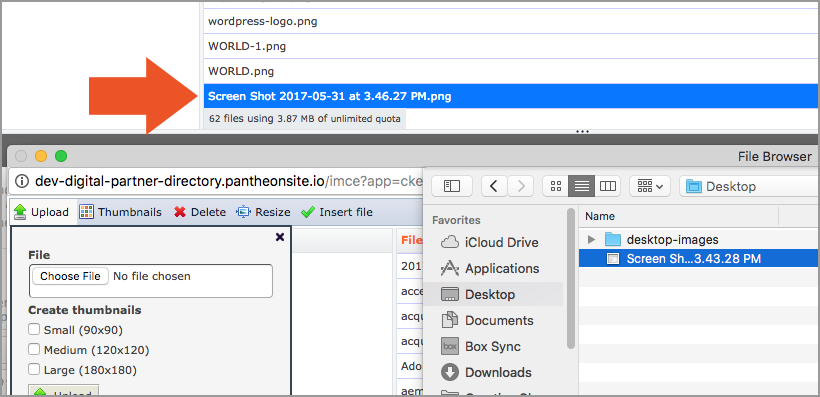
Step 7: Double click the newly uploaded image
Step 8: Select final options and click 'OK'
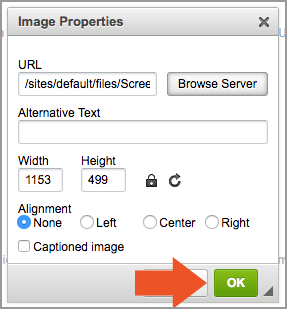
Step 9: Be sure that the "Text format" field under the editor window is set to "Full HTML". "Filtered HTML" and "Plain Text" will not display images.